- Published on
BIM for Contractors: Accessing Models, Clash Detection & Shop Drawings
Contractors work within a narrower BIM scope compared to consultants. Your primary focus is coordinating your trade-specific work with the central model, checking for clashes, developing shop drawings, and submitting BIM deliverables for your scope.
Unlike consultants who manage the overall design, contractors don't choose which BIM software or CDE platform to use—you must work with the tools specified by the project owner. This guide covers the essential workflows contractors need to master: accessing the central model, clash detection, shop drawing development, and BIM submission requirements.
If you need help with BIM coordination, consider BIM services to support your team.
Working with the Project's BIM CDE

As a contractor, you don't choose which BIM Common Data Environment (CDE) to use. The project owner or main consultant typically specifies the platform in the contract or BIM Execution Plan (BEP). Common platforms include:
- Autodesk Construction Cloud (ACC) – Popular for Revit-based projects
- ProjectWise – Common in infrastructure and large-scale projects
- BIMCloud – Often used with Archicad workflows
- BIM Collaborate – Autodesk's cloud collaboration platform
Your first step is to request access to the project's CDE as early as possible. This gives you time to familiarize yourself with the folder structure, naming conventions, and permissions before you need to submit deliverables.
Understanding the CDE's document control workflow is critical—you'll need to know where to find the latest central model, where to upload your submissions, and how approvals are tracked.
Accessing the Central BIM Model

Once you have CDE access, your next step is to download the central BIM model created by the consultants. This model contains the coordinated architecture, structural, and MEP designs at LOD 300.
As a subcontractor, you need to overlay your trade-specific BIM scope onto this central model. For example:
- ACMV contractors overlay ductwork and equipment
- Electrical contractors add conduit routing and fixtures
- Plumbing contractors model piping and drainage systems
This overlay process is critical for clash detection. You're checking whether your scope conflicts with other trades or with the structural/architectural elements already in the model.
Work closely with the design team to understand:
- Which reference files to use
- Coordinate systems and origin points
- Naming conventions for your elements
- Expected level of detail (typically LOD 350-400 for construction)
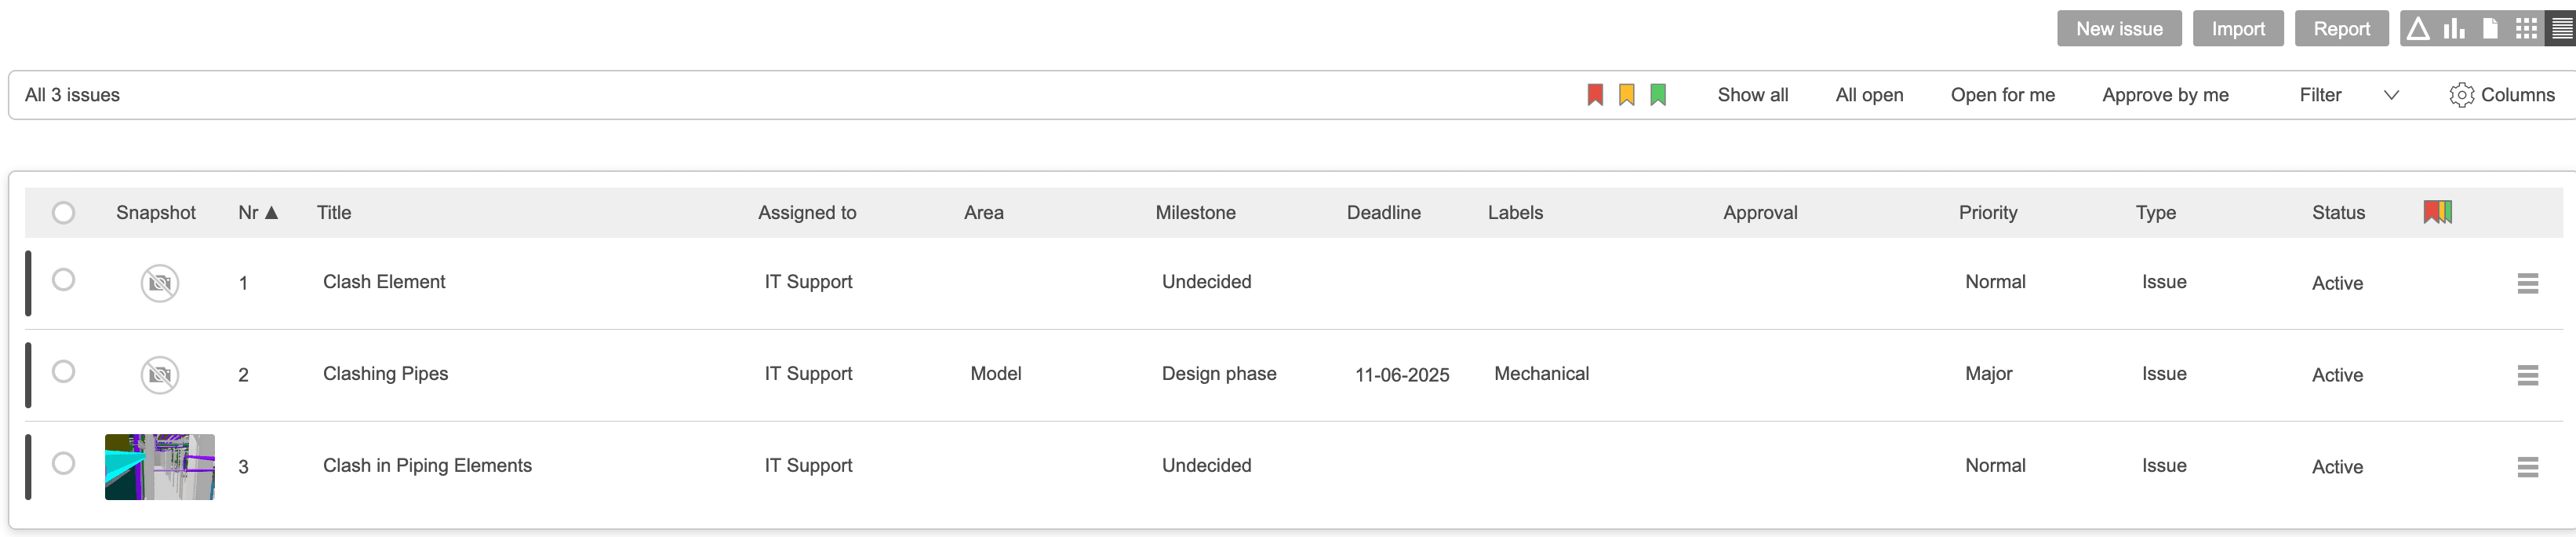
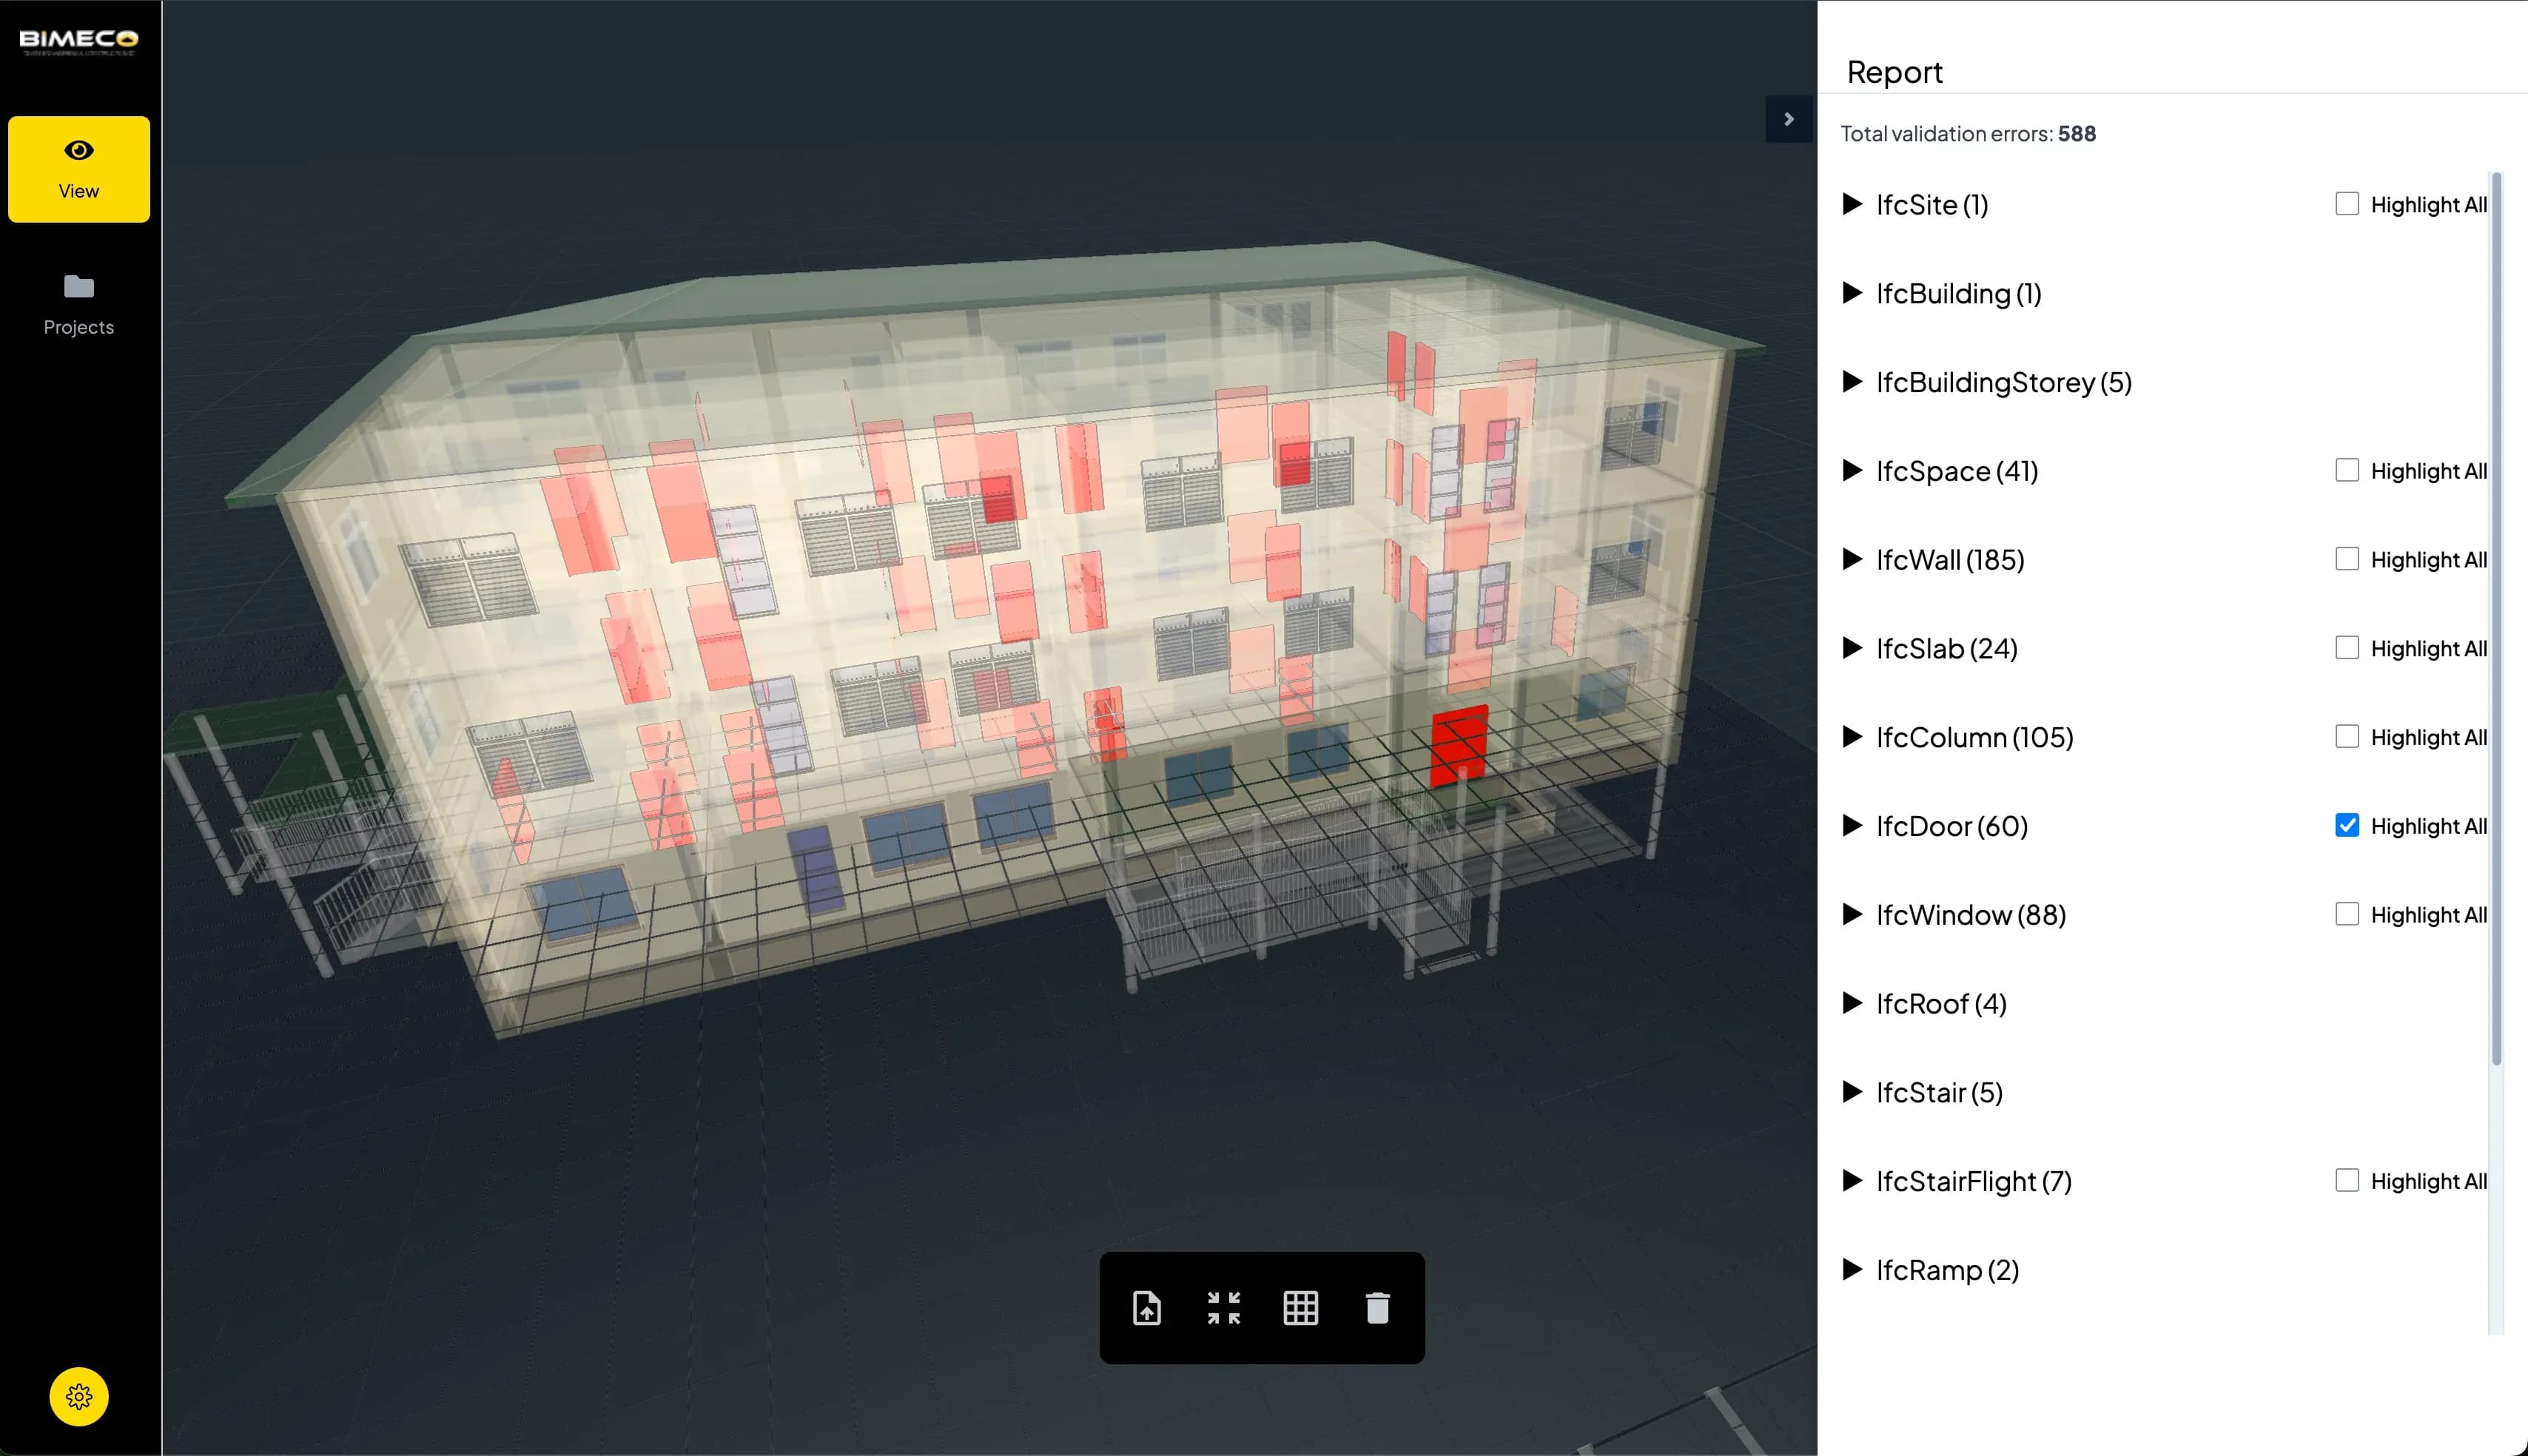
Clash Detection Workflow

After overlaying your trade scope on the central model, run clash detection before fabrication begins. This is when you identify conflicts between your work and other disciplines. If you need help with BIM coordination, service providers can support this workflow.
Common clash detection tools include:
- Navisworks – Industry standard for coordination
- BIMcollab – Issue tracking and clash management
- Revizto – Model-based collaboration
When to Run Clash Checks
- Initial coordination – After creating your first model overlay
- Before fabrication – To catch issues before manufacturing begins
- After design changes – Whenever the central model is updated
Resolving Clashes
When clashes are detected, coordinate with other trades through ICE (Issue, Coordination, Exchange) meetings. Document all resolutions in the CDE and update your model accordingly.
Clashes found during construction cause expensive delays and rework—this is why early BIM coordination is critical.
Shop Drawing Development

Once clashes are resolved and you're approved to proceed, develop shop drawings from your LOD 400 BIM model. These drawings must include fabrication details, connection points, and assembly instructions clear enough for site workers.
From BIM to Shop Drawings
Most BIM authoring tools like Revit, OpenBuildings, and Tekla include CAD drafting capabilities. You can generate 2D shop drawings directly from your 3D model, including:
- Fabrication details and dimensions
- Enlarged views of complex connections
- Assembly sequences and installation notes
- Material specifications and quantities
Submission and Approval
Shop drawings are typically submitted alongside the BIM model as part of a single transmittal through the CDE. Ensure your drawings reference the correct model version and follow the project's naming conventions.
Site workers will rely on these drawings, so clarity is critical. Include typical sections, connection details, and any site-specific adjustments.
If your team doesn't have in-house CAD capability, CAD drafting services can generate shop drawings from your BIM models.
BIM Submission Requirements
What Contractors Must Submit
As a contractor, you'll be required to submit coordinated BIM models for your specific trade scope. Typical deliverables include:
- IFC files – Vendor-neutral format for interoperability
- Native BIM files – Revit, Tekla, or other authoring tool formats (if specified)
- 2D shop drawings – Generated from the LOD 400 model
- Coordination documentation – Clash detection reports and resolutions
Submission Timing
BIM submissions are typically tied to construction milestones:
- Pre-fabrication – Submit coordinated model for approval
- During construction – Regular model updates as work progresses
- Project completion – Final as-built model reflecting installed conditions. For verification, consider Scan-to-BIM services to compare as-built to design.
Quality Checks Before Submission
Before submitting your BIM deliverables, verify:
- All clashes with other trades are resolved
- Model meets specified LOD requirements (typically 350-400)
- Elements follow project naming conventions
- IFC export is clean and validated
- Shop drawings match the model
The CDE platform will track your submissions, approvals, and any revision requests. Make sure you understand the approval workflow before your first submission.
Common BIM Software

Important: Your contract or BEP may specify which software to use. Unlike consultants who can choose their tools, contractors typically must work with the platforms required by the project.
Common tools you may encounter include:
| Tool | Purpose | Notes |
|---|---|---|
| Revit | BIM authoring | Widely used for architecture, structure, and MEP modeling |
| OpenBuildings Designer | BIM authoring | Bentley’s multidisciplinary building design platform |
| Archicad | BIM authoring | Popular among architects for concept-to-detail workflows |
| Navisworks | Collaboration | Industry standard for coordination and review |
| Revizto | Collaboration | Issue tracking and model-based collaboration |
| BIMcollab | Collaboration | Issue tracking and model-based collaboration |
| ProjectWise | Collaboration | Large-scale document control and audit trail for infrastructure projects |
| Synchro 4D | Collaboration | 4D simulation and construction sequencing |
| Autodesk Construction Cloud | Collaboration | Supports RFIs, markups, versioning, and permissions |
With broader use of IFC, contractors can integrate different tools across vendors without losing interoperability.
Getting Started with BIM
1. Request CDE Access Early
Contact the project team to request access to the BIM CDE as soon as your contract is signed. Early access lets you understand the folder structure, file naming conventions, and submission workflows before deadlines.
2. Download and Review the Central Model
Once you have access, download the latest central model from the consultants. Understand:
- Which disciplines are included
- Coordinate system and reference points
- Current LOD and level of coordination
- Scheduled clash detection sessions
3. Build Internal Capability
Assign a BIM coordinator or lead for your trade. They should understand:
- Your authoring tool (Revit, Tekla, etc.)
- Clash detection software (Navisworks, BIMcollab)
- Shop drawing generation from BIM
- IFC export and validation
If you don't have internal BIM expertise, partner with a BIM service provider like Bimeco to support modeling, clash checks, and shop drawing preparation.
Need Help?
Whether you're tendering for a BIM-mandated project or refining in-house workflows, we can help. From BEP interpretation to BIM model development, clash coordination, and ICE facilitation, our team ensures BIM requirements are met without disrupting site operations.
Use our BIM Cost Calculator to estimate costs or contact us to discuss your project needs.
Frequently Asked Questions
Related Articles
BIM Implementation in Singapore: A Practical Guide for Subcontractors
A practical guide for MEP subcontractors adopting BIM in Singapore. Learn workflows, costs, and CORENET X requirements for 2026 compliance.
Free Tools for CORENET X Compliance: Bimeco Validator Features
Free web-based tool for CORENET X BIM submissions in Singapore. Validate & edit IFC+SG models, handle 5GB files, bulk editing—all free. See key features.
CORENET X BIM Submission Tool: The Bimeco Validator
Need to validate and update your BIM models for CORENETX submission? The Bimeco Validator helps users validate and update their model files for CORENET X compliance.